Rendering Pipeline
Usually when working with openGL object coordinates are represented by a 4 dimensional vector where the 4th number is always 1:
| x |
| y |
| z |
| 1 |
A general transformation to include both rotation and translation can then be represented using a 4x4 matrix as described on this page:
| r00 | r01 | r02 | t0 |
| r10 | r11 | r12 | t1 |
| r20 | r21 | r22 | t2 |
| 0 | 0 | 0 | 1 |
Where: rij represents the rotation terms and ti represents the translation
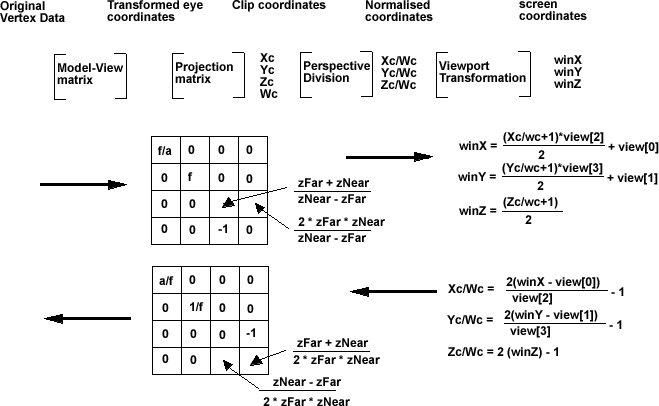
However, once the objects coordinates have been calculated, we then need to project the result onto a two dimensional screen. To do this we apply the projection matrix, normailise by dividing all terms by w, the x and y values then represent the position on the screen and the z value is used in z ordering to work out what is in front.
A Projection matrix for a frustum projection is: (see openGL documentation for glFrustum for further information).
| FD/aspect | 0 | 0 | 0 |
| 0 | FD | 0 | 0 |
| 0 | 0 | (zFar + zNear)/(zFar - zNear) | -1 |
| 0 | 0 | (2 * zFar * zNear)/(zFar - zNear) | 0 |
So, to summarize, the sequence is as follows:
| Model-View matrix | [x,y,z,1] |
| Projection matrix | [x,y,z,w] |
| Perspective division | [x/w,y/w,z/w,1] |
| Viewport Transformation | [u,v] |
This is all based on projective geometry which is explained on this page.
Object coordinates

Points in 3D space are represented by 3 numbers represented by its position in the x, y and z planes.
Normalized coordinates - frustum projection
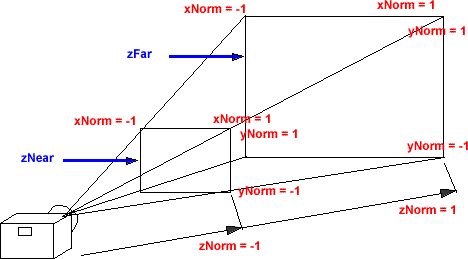
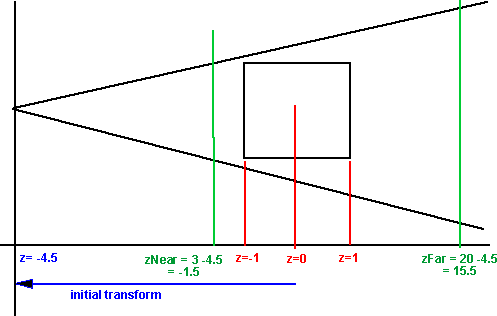
In order to represent this on a 2D screen we need to define a projection. A frustum projection shows an object, which is closer to the camera as larger than an object which is further away. To do this, the x and y coordinates are scaled by an amount inversely proportional to the position in the z dimension.
Screen coordinates - frustum projection
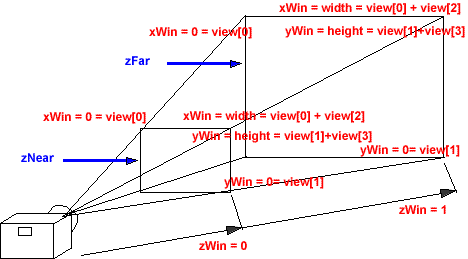
The viewport transformation scales and shifts the normalised coordinates to fit the size of the screen.
Pipeline
The rendering pipeline takes the model data and renders it on the screen. This is done partly by software and partly by hardware, the boundary between these depends on what graphics card and operating system that you are using.
As shown in the diagrams above, in a frustum projection, the x and y coordinates are scaled by an amount inversely proportional to the position in the z dimension. A 3x3 matrix cannot represent such a transformation, so in the pipeline an additional variable 'w' is added to each coordinate. This is a scaling value, used to scale the x,y and z values depending on the inverse of its distance from the camera.
To do this, the matrices are increased to 4x4 to include this scaling value.